Command Palette
Search for a command to run...
Crowd Distance Monitoring DeepSOCIAL The Most Complete Chinese Paper + Source Code Guide
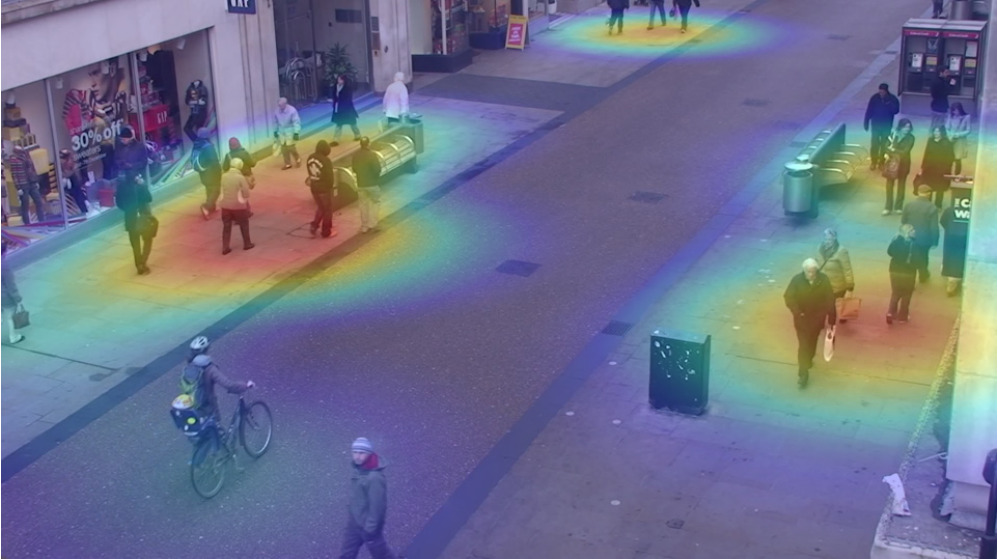
The DeepSOCIAL crowd distance monitoring project, open sourced by Mahdi Rezaei, a researcher at the Institute of Transport Studies at the University of Leeds in the UK, has become a popular online application recently.Online source code tutorial access
DeepSOCIAL uses YOLOv4 to achieve pedestrian detection, then uses SORT to achieve target tracking, and uses monocular vision IPM inverse perspective mapping to achieve distance estimation, and finally evaluates crowd distance monitoring and risk assessment.

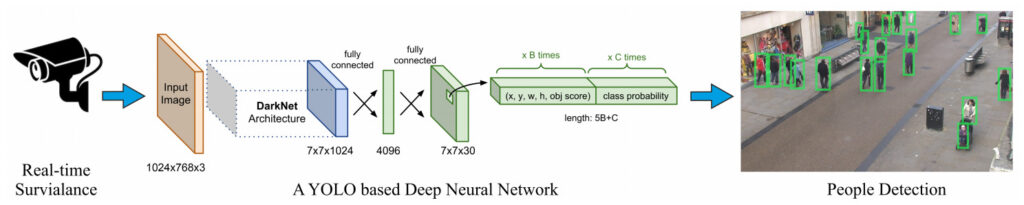
Pedestrian Detection: YOLO v4
In the DeepSOCIAL project, YOLOv4 was selected to implement pedestrian target detection. In the paper, the author compared several target detection methods:RCNN, fast RCNN, faster RCNN, SSD, YOLOIn the datasetPASCAL Visual Object Classes (VOC) and MS COCOTested in .
Used to measure recognition accuracy and speed in target detection:**mAP (mean Average Precision) and FPS (Frame Per Second)**Conduct an assessment.
Finally, YOLOv4 was selected as the target detection method.


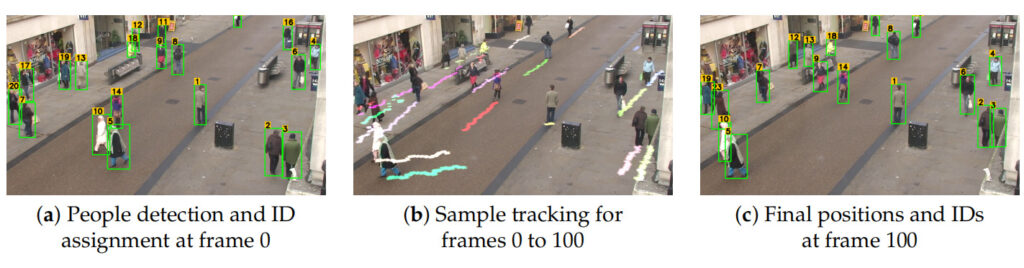
Pedestrian Tracking: SORT
In DeepSOCIAL's pedestrian tracking, the Simple Online and Real-time (SORT) algorithm was selected.
Pedestrian Distance Estimation: IPM Inverse Perspective Mapping
The DeepSOCIAL project uses monocular vision, but uses a single camera to project the three-dimensional world scene onto a two-dimensional perspective image plane, which easily leads to distortion of the pixel distance between objects.

In order to apply a calibrated IPM (Inverse Perspective Mapping) transition, you first need to remove the perspective effect by setting the depth parameter z = 0 and perform camera calibration. You also need to know the camera's position, height, field of view, etc.
Project Operation
1. Introducing dependencies
from IPython.display import display, Javascript, Image
from base64 import b64decode, b64encode
import os
import cv2
import numpy as np
import PIL
import io
import html
import time
import matplotlib.pyplot as plt
%matplotlib inline
2. Compile YOLOv4
%cd darknet !sed -i 's/OPENCV=0/OPENCV=1/' Makefile!sed -i 's/GPU=0/GPU=1/' Makefile!sed -i 's/CUDNN=0/CUDNN=1/' Makefile!sed -i 's/CUDNN_HALF=0/CUDNN_HALF=1/' Makefile!sed -i 's/LIBSO=0/LIBSO=1/' Makefile
3. Using Darknet’s Python interface
# 导入 Darknet 函数来执行对象检测
from darknet2 import *
# 载入 YOLOv4 架构
network, class_names, class_colors = load_network("cfg/yolov4.cfg", "cfg/coco.data", "/openbayes/input/input0/DeepSocial.weights")
width = network_width(network)
height = network_height(network)
# 在图像上运行 Darknet helper 函数
def darknet_helper(img, width, height):
darknet_image = make_image(width, height, 3)
img_rgb = cv2.cvtColor(img, cv2.COLOR_BGR2RGB)
img_resized = cv2.resize(img_rgb, (width, height),
interpolation=cv2.INTER_LINEAR)
# 获取图像比例,将边界框转换为适当的尺寸
img_height, img_width, _ = img.shape
width_ratio = img_width/width
height_ratio = img_height/height
# 运行 Darknet 模型
copy_image_from_bytes(darknet_image, img_resized.tobytes())
detections = detect_image(network, class_names, darknet_image)
free_image(darknet_image)
return detections, width_ratio, height_ratio
4. Use SORT to achieve real-time tracking goals
!pip install filterpyfrom sort import *mot_tracker = Sort(max_age=25, min_hits=4, iou_threshold=0.3)
5. Input settings
Input            = "/openbayes/input/input1/OxfordTownCentreDataset.avi"
ReductionFactor  = 2
calibration      = [[180,162],[618,0],[552,540],[682,464]]
6. DeepSocial parameter settings and function introduction
7. Reasoning process
8. Display the results
Pedestrian Target Detection & ID Assignment Pedestrian tracking & distance measurement Crowd gathering heat map The code for 6&7 is relatively long.Please visit the original tutorial